Guide to the Information Security Policies Module
How to Manage your Cyber Security Policies with HighGround
Table of Contents
What are Information Security Policies?Navigate the TabsGetting Started with Information Security PoliciesViewing your PoliciesReviewing your PoliciesInformation Security Status'How-To GuidesWhat are Information Security Policies?
Cyber Security is not only about technical controls, professional services and sophisticated software. Governance is just as crucial to maintaining a strong security posture.
Information Security policies set the benchmark for what is acceptable in your business. They provide employees with clear guidance on what is expected of them, what they should do as well as what they shouldn’t. They are the fundamental ‘How we do it here’ foundations to your organisations approach to cyber and information security, and above all, they provide a layer of protection to the business to enforce unwanted behaviour by enforcing accountability and adherence to the standards the business has chosen to uphold itself to.
Navigate the Tabs
There are three tabs within the Information Security module:
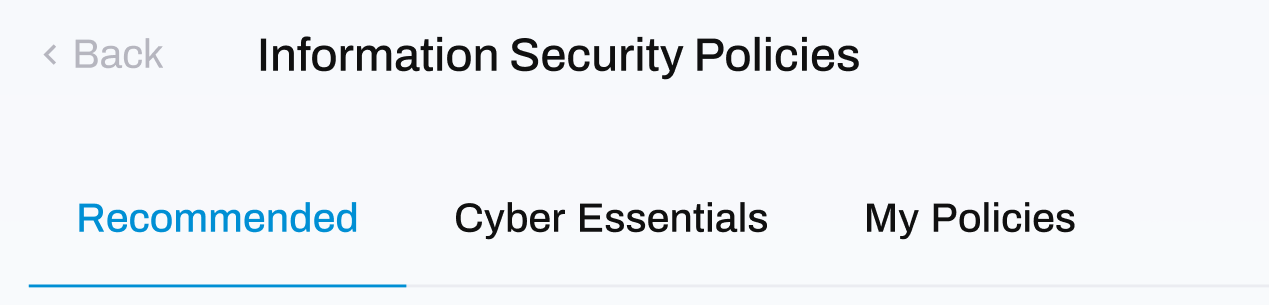
- Recommended: this section contains the essential policies that we recommend your organisation has in place.
- Cyber Essentials: this section contains the policies you need for Cyber Essentials, and is a helpful section to store these separately from your other policies.
- My Policies: this section is designed for you to upload any additional policies you have to keep them together with our recommended and cyber essentials policies.
Getting Started with Information Security Policies
Recommended Policies:
If you are unsure of what policies you should have in place, take a look at the recommended policies located under the Recommended tab.

Free Policy Pack:
Our Free Policy Pack, which contains a suite of pre-written policies to get you started, can be accessed by clicking the Free Policy Pack button located at the top of the window. This will download the files to your PC, ready to be used.
Premium Policy Pack:
Don’t waste time writing policies, our Premium Policy Pack will save you countless days of effort and ensure you have a robust and compliant information security management system quickly and effortlessly. This pack will assist you in rapidly establishing a strong information security policy baseline using pre-written ISO 27001 approved policies.
You can find out more information by clicking the Buy Premium Pack button toward the top-right of the module window:

How to Purchase a Pro Service
The Pro Service i'm looking for isn't listed?
We offer the Security Consultation Service so that we can discuss custom services depending on your needs. We can also combine parts of different products to create unique Pro Service offerings.
Please submit an enquiry to the ‘Security Consultation’ product and we will discuss your requirements with you.
DeleteSTEP 1: Go to Pro Services
From the main left-hand menu, go to Pro Services:

STEP 2: Click on the Service
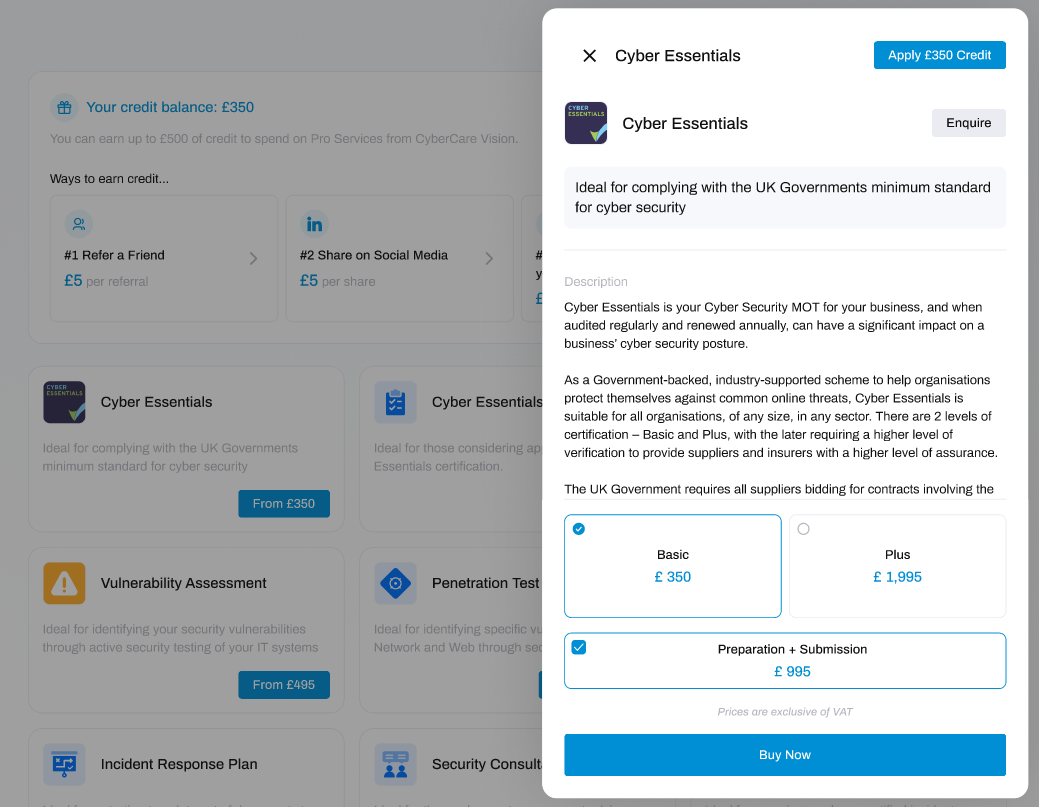
The Pro Services section of HighGround displays all the paid services we offer.
You can scroll through these to find and click on the service you want. This will open up a new window to the side, containing details and purchase options for that service:
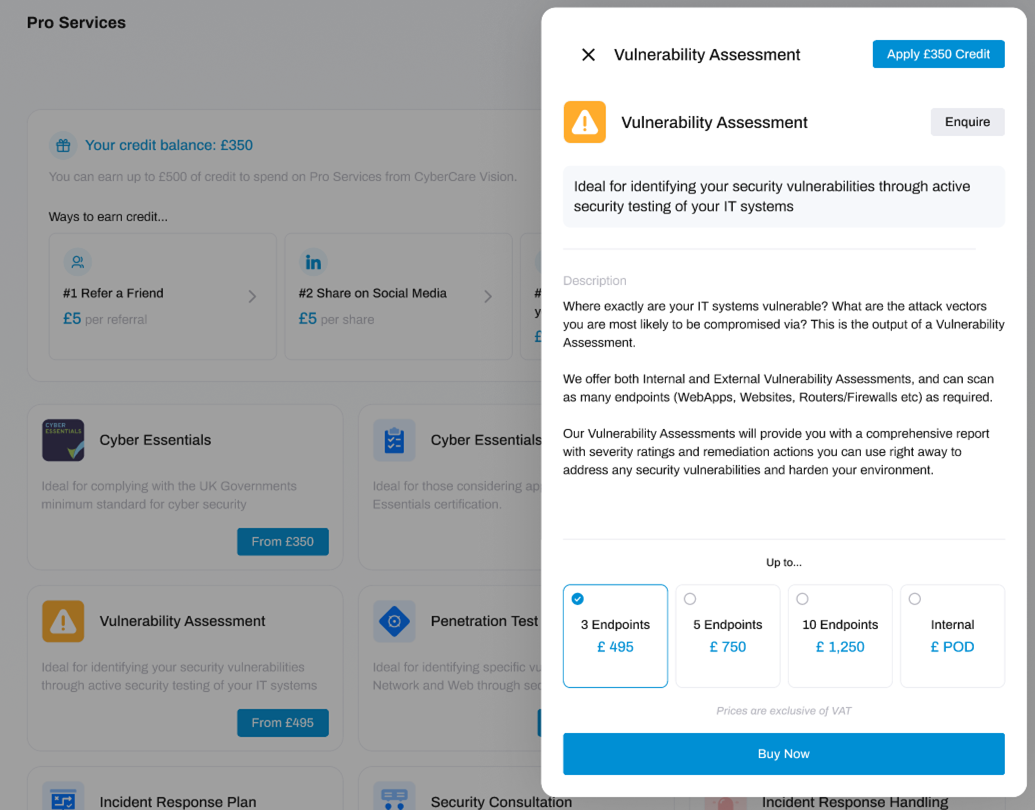
STEP 3: Choose the Purchase Option
Depending on the Pro Service you are looking at, there may be more than one purchase option to choose from. These options are shown at the bottom:
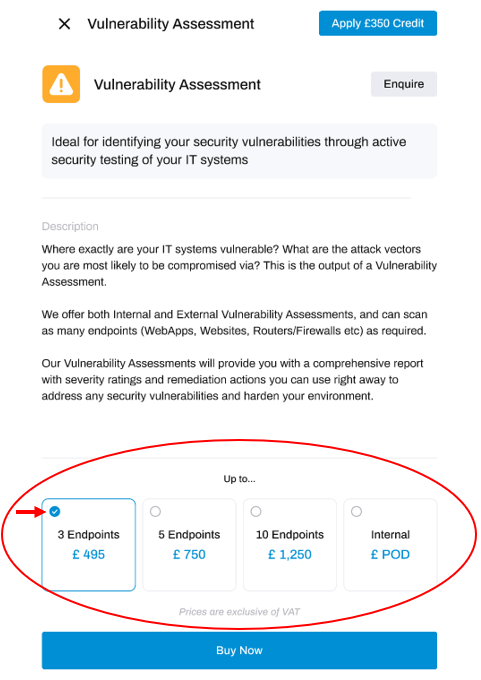
Ensure that the option you want to choose has a blue tick in it. If not, click that option to move the blue tick to your selected choice.
How do I make an enquiry about a Pro Service?
If you would like to make an enquiry to HighGround about any of the Pro Services available, follow the steps below:
STEP 1: Go to Pro Services
From the main left-hand menu, go to Pro Services:
STEP 2: Click on the Service
The Pro Services section of HighGround displays all the paid services we offer. You can scroll through these to find and click on the service you want.
This will open up a new window to the side, containing details and purchase options for that service.
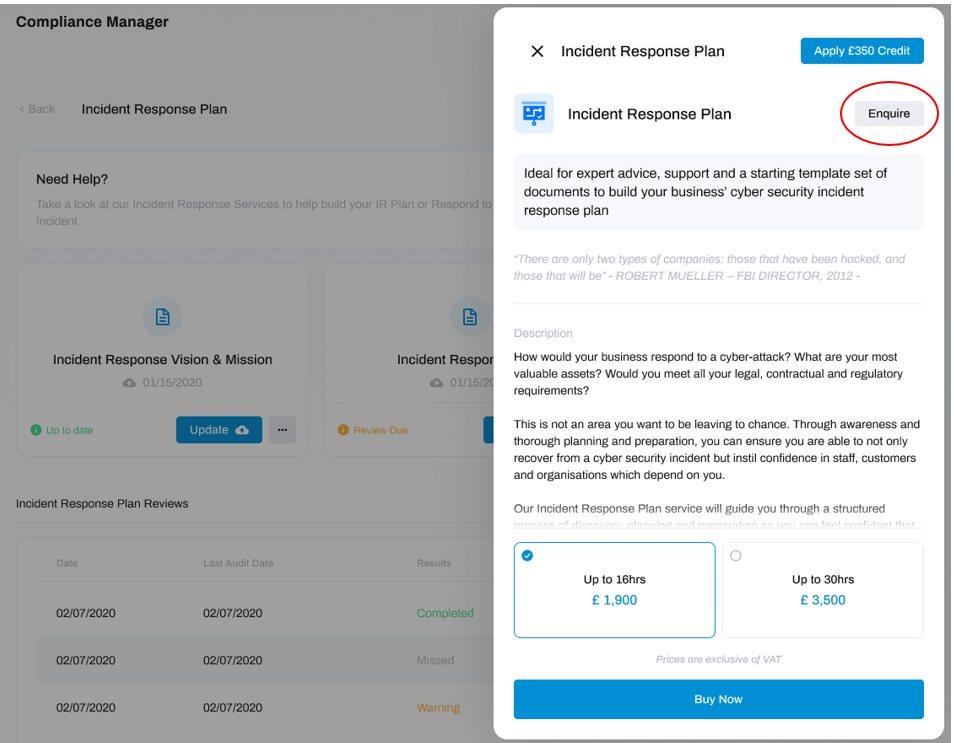
STEP 3: Click Enquire
Click the Enquire button located towards the top-right of the service window:
STEP 4: Fill in the Details
Now you can add in the details of your enquiry, along with entering the phone number that you would like to be contacted on regarding the enquiry.
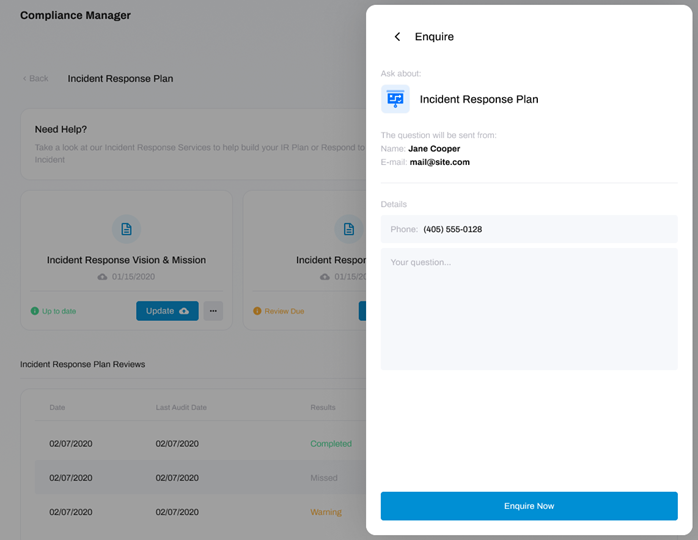
STEP 5: Send the Enquiry
Now the details are filled in, click the Enquire Now button to send the enquiry to us.

And that's it! We will receive your enquiry and respond within 48 hours.
How do I save money by using my Pro Services Credits?
Pro Services Credit enables you to save money on your purchases.
If you have earned Pro Services Credit, you can use them whenever you buy one of our Pro Services. The amount you have accrued in credit will be deducted from the cost of that service.
To learn how to apply your Pro Services Credit to a purchase, follow the steps below:
STEP 1: Go to Pro Services
Navigate to the Pro Services module from the left-hand side main menu.
In this module you will find all of our Pro Service offerings.
STEP 2: Pick a Service
Choose and click on the service which you would like to apply your Pro Services Credit to.
Clicking on any of the services will open a new window to the side of the screen, containing details and purchase options for that service:
STEP 3: Apply Credit
Click on the blue 'Apply <your credit> Credit' button.
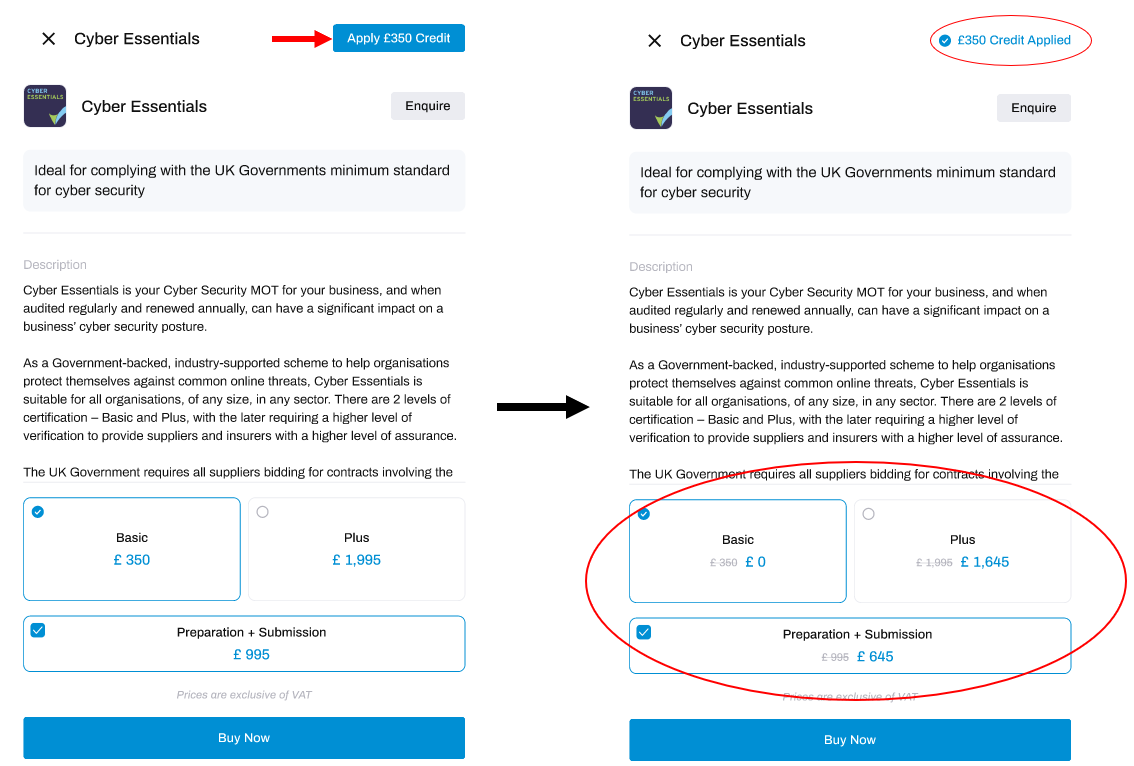
The button will change to inform you that your Pro Services Credit has been applied.
The amount of credit applied will also be reflected in the purchase options at the bottom, which will show the previous price scored out in grey, and the new, reduced price in blue.
STEP 4: Purchase the Service
Now your Pro Service Credits have been applied, click the Buy Now button to purchase this service

And that's it! Plus, you can save more money off of future purchases by earning more Pro Services Credit!
STEP 4: Buy the Pro Service
Now the details are filled in, click the Buy Now button to make the purchase.

And that's it! Thank you for your purchase, a notification will get sent to our Pro Services team who will contact you within 24 hours to get started with your service.
What happens after I buy a Pro Service?
We will reach out to you within 24 hours to arrange a meeting and schedule the service.
DeleteHow to Enquire about a Pro Service
If you would like to make an enquiry to HighGround about any of the Pro Services available, follow the steps below:
STEP 1: Go to Pro Services
From the main left-hand menu, go to Pro Services:
STEP 2: Click on the Service
The Pro Services section of HighGround displays all the paid services we offer. You can scroll through these to find and click on the service you want.
This will open up a new window to the side, containing details and purchase options for that service.
STEP 3: Click Enquire
Click the Enquire button located towards the top-right of the service window:
STEP 4: Fill in the Details
Now you can add in the details of your enquiry, along with entering the phone number that you would like to be contacted on regarding the enquiry.
STEP 5: Send the Enquiry
Now the details are filled in, click the Enquire Now button to send the enquiry to us.
And that's it! We will receive your enquiry and respond within 48 hours.
How to Upload a Policy
Click the policy you would like to upload.

This will open another window, where you can attach your document and enter some relevant details:
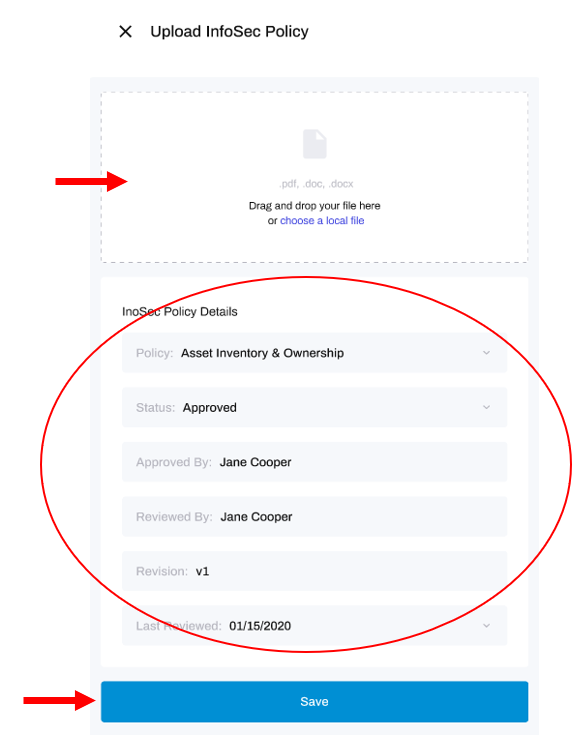
Next, use the drop-down arrow and text boxes in the Details section to add details for;
Policy: the name of the policy
Status: whether the policy has been approved for use, or not
Approved By: who approved the policy (if it has been approved)
Reviewed By: the person who reviewed the policy
Revision: the current version of the policy
Last Reviewed: the date that the policy was last reviewed
After, click Save.
And that's it! You have uploaded your policy.
DeleteViewing your Policies:
At the bottom of the Information Security Policies module you can see the policies you have in place:
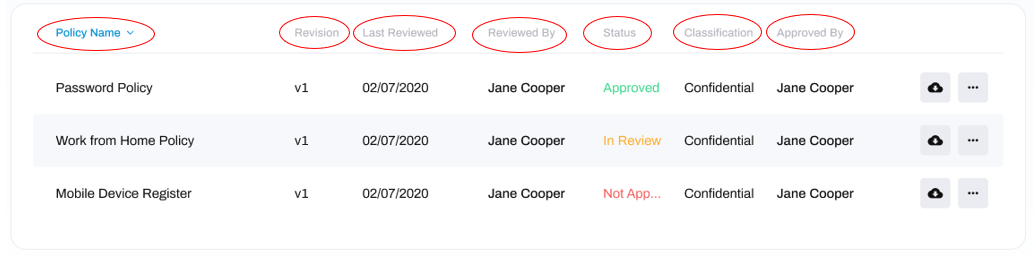
The columns outline the following information:
- Policy Name: name of you policy.
- Revision: the current version of your policy.
-
Last Reviewed: the date you last reviewed that policy.
- Reviewed By: the name of the person who reviewed the policy.
-
Status:
- Approved: the policy has been approved for use.
- In Review: the policy has been written but is currently being reviewed.
- Not Approved: the policy has been written but has not yet been approved for use.
-
Classification:
- Public: the policy can be disclosed publicly within the organisation
- Confidential: the policy is confidential and can only be shared with those listed in the 'Document Distribution' section.
- Approved By: the name of the person who approved the policy for use.
Reviewing your Policies:
You need to review your policies every 12 months in order to keep your Information Security status and CyberCompliance KPI healthy. After reviewing them, you will need to update the policy details with the last reviewed date.
To do so, click the three dots next to the policy, and click Update Policy.
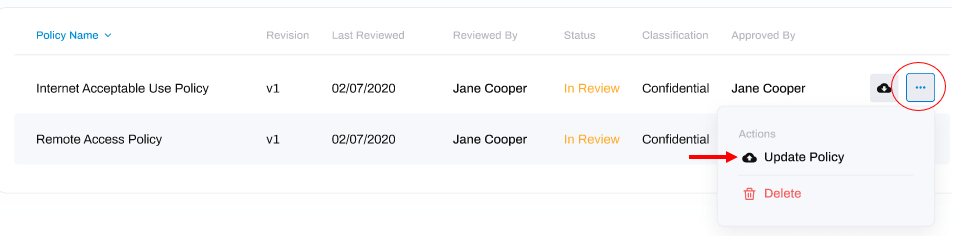
You will need to edit the fields Reviewed By and Last Reviewed with the name of the reviewer, and the date you conducted the review, respectively.
Understanding your Information Security Policy Status'
In order to stay up-to-date and effective, your Information Security Policies should cover a wide range of areas, and be reviewed on an annual basis. The Compliance Status' are designed with this in mind, and will keep you informed on the health of your Information Security Policies.
To learn more about what your status means, choose the matching icon from the tabs below:

Status' in a default state appear as a blue cross, and indicate that you have not uploaded any Information Security Policies yet.
Delete
Status' in a healthy state appear with a green tick, and the word Complete.

- This status indicates that all (Recommended + Cyber Essentials) policies are uploaded, approved and have been reviewed within the last year.

Status' in a warning state will show with an orange exclamation mark and the words Missing Policies.
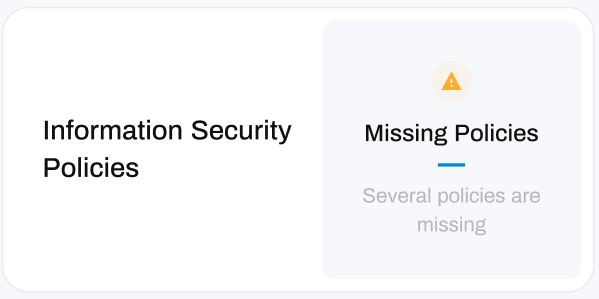
This status indicates that either;
- The majority, but not all, of the recommended policies have been uploaded, approved and reviewed within the last year.
- A moderate number of policies have been uploaded, approved and reviewed within the last year.

Status' in a critical state appear as a red exclamation mark, alongside the words Limited Policies.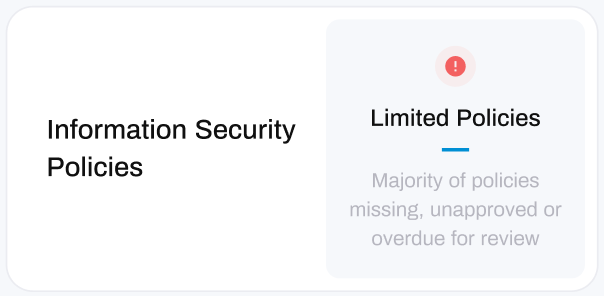
This status indicates that either;
- You only uploaded a limited number of Information Security policies.
- You have uploaded policies which are unapproved.
- You have uploaded policies which have not been reviewed in over a year.
How-To Guides
Upload/Download a Policy
Upload:
Click the policy you would like to upload.
This will open another window, where you can attach your document and enter some relevant details:
Next, use the drop-down arrow and text boxes in the Details section to add details for;
Policy: the name of the policy
Status: whether the policy has been approved for use, or not
Approved By: who approved the policy (if it has been approved)
Reviewed By: the person who reviewed the policy
Revision: the current version of the policy
Last Reviewed: the date that the policy was last reviewed
After, click Save.
And that's it! You have uploaded your policy.
Download:
To download a policy, scroll down to the bottom of the window where you can see your existing policies, then click the download icon circled in the image below:
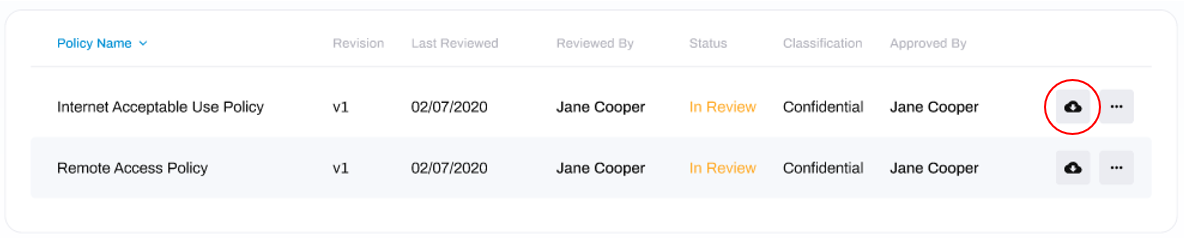
Your policy should now be available on your device.
And that's it! You have downloaded your policy.
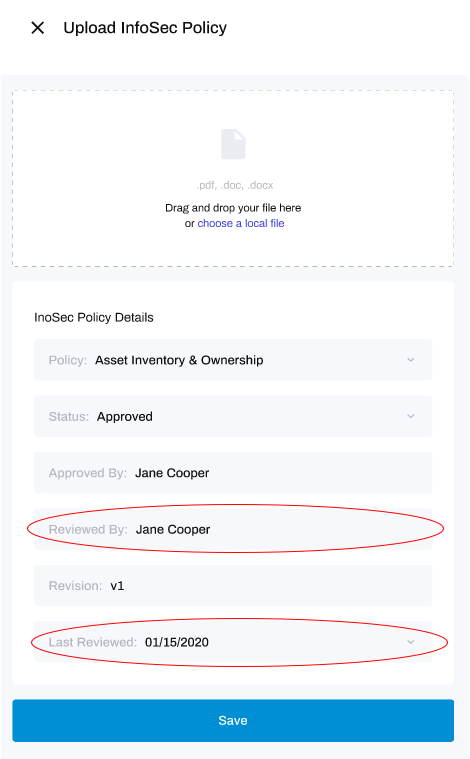
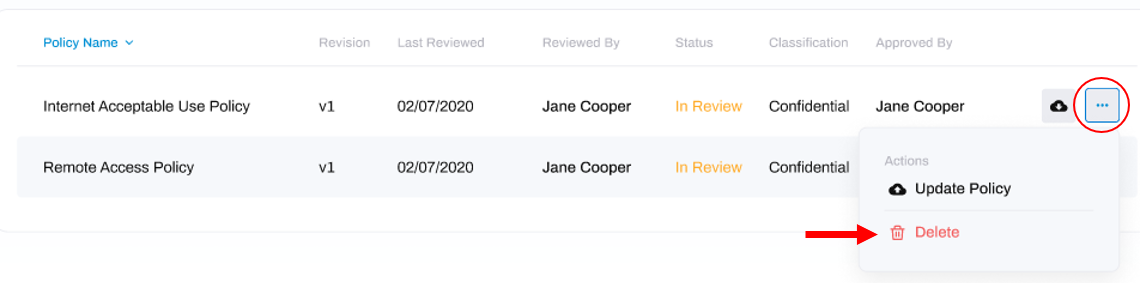
Update a Policy
To update a policy, scroll down to the bottom of the window where you can see your existing policies, click the three dots to the right of the policy that you want to update, then click Update Policy.
This will open another window, where you can attach the updated policy and enter some relevant details:

Next, use the drop-down arrow and text boxes in the Details section to add the following details of the policy:
- Policy: the name of the policy
- Status: whether the policy has been approved for use
- Approved By: the name of the person who approved the policy
- Reviewed By: the name of the person who reviewed the policy
- Revision: the current version of the policy
- Last Reviewed: this is the date that that the policy was last reviewed
After, click Save.
And that's it! You have updated your policy.
Delete a Policy
To delete a policy, scroll down to the bottom of the window where you can see your existing policies, click the three dots to the right of the policy that you want to update, then click Delete.
And that's it! You have deleted your policy.