Guide to the Incident Response Plan Module
How to Manage your Incident Response with HighGround
Table of Contents
What is Incident Response?Incident Response Documentation:Getting Started with Incident ResponseReviewing your Incident Response Documentation:Incident Response Status'How-To GuidesWhat is Incident Response?
Incident Response is an essential component of your cyber security strategy, and is the last line of defence (or picking up the pieces) of a cyber-attack.
Whether actual or suspected, employees should be encouraged to report any signs of a security incident, enabling Incident Triage to take place to determine whether the reported Incident is real or simply a False Alarm. Oftentimes, a bad actor (aka hacker) will compromise an organisations systems then sit quietly undetected, monitoring and probing the environment for an opportunity to move laterally or escalate it's privileges to a point where it can execute with maximum effect. This is why diligent Incident Response is so critical to an organisations defences, as many cyber-attacks could be prevented if any and all reports, whether from users or tools, are responded to consistently and meticulously.
Without an Incident Response strategy, you will be woefully unprepared in the event of a cyber attack.
Incident Response Documentation:
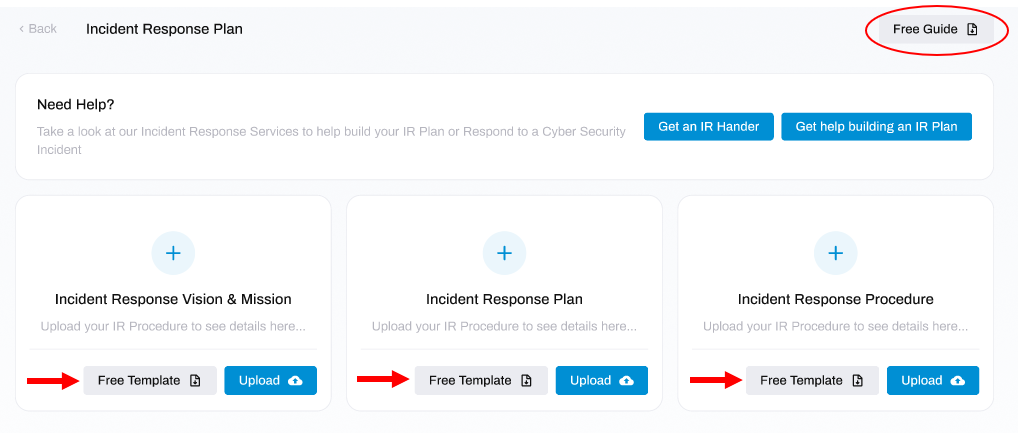
There are 3 documents included within the HighGround Incident Response Pack:
1. Vision and Mission - this sets out the key stakeholders/sponsors desired outcomes. Think of this document as a top-down approach to building incident response, where the board of directors sets our their vision for the incident response requirements within the business, and the mission is to outline the aims and goals.
2. Incident Response Plan - this is the plan itself, which will be used by an Incident Response Handler, Internal IR Champions or Executives within the organisation. This document requires input in all areas, and will only be as useful as it is complete and comprehensive. If you have missing information, you likely have problems further upstream which should be rectified before proceeding.
3. Policy & Procedure - this is a public document which should be accessible by all employees, and in particular by Internal IR Champions. In the event of a suspected or actual incident, this is the first document that you will reach for and will aid users in determining if an incident may have occurred and how to report an incident.
Getting Started with Incident Response
By utilizing our vast array of free resources, paid services and/or using your own, the Compliance Manager gives you best possible start to improving or recording your cyber security compliance.
See the tabs below for the free vs. paid services we offer in Incident Response:
Free Resources
To help you get started, you can download our Free Guide on Incident Response, and Free Templates for each of the IR documents. These provide guidance and examples to assist you in creating your own documents. If you have limited or no experience in building Compliance documents, or would like to check your current documents against best practices from our certified Incident Response Handlers, these free guides are a great way to get started.
To view our Free Guide, click the Free Guide button located at the top-right corner of the Incident Response window. To view our IR templates, click the Free Template button at the bottom of any of the documents:
Professional Assistance
If you'd prefer to have a certified and experienced team of Incident Handlers take care of your Incident Response, we offer an Incident Response service with Guaranteed SLAs as part of our Pro Services.
Our Incident Response services include;
-
Incident Response Plan Service to guide you through a structured process of building your IR plan. Available as a 16-hour or 30-hour service depending on how much time you need to work through this process
-
Incident Response Handling Service provides you with a team of certified and experienced Incident Response Handlers at your disposal - ready for when an incident occurs. Our monthly payment packages offer Incident Response services in two options:
- Available during business hours (8 hours per day, 5 days a week)
- Available anytime (24 hours, 7 days a week)
- Additionally, there is a one-off Incident Response service that is priced per hour.

How to Purchase a Pro Service
The Pro Service i'm looking for isn't listed?
We offer the Security Consultation Service so that we can discuss custom services depending on your needs. We can also combine parts of different products to create unique Pro Service offerings.
Please submit an enquiry to the ‘Security Consultation’ product and we will discuss your requirements with you.
DeleteSTEP 1: Go to Pro Services
From the main left-hand menu, go to Pro Services:

STEP 2: Click on the Service
The Pro Services section of HighGround displays all the paid services we offer.
You can scroll through these to find and click on the service you want. This will open up a new window to the side, containing details and purchase options for that service:
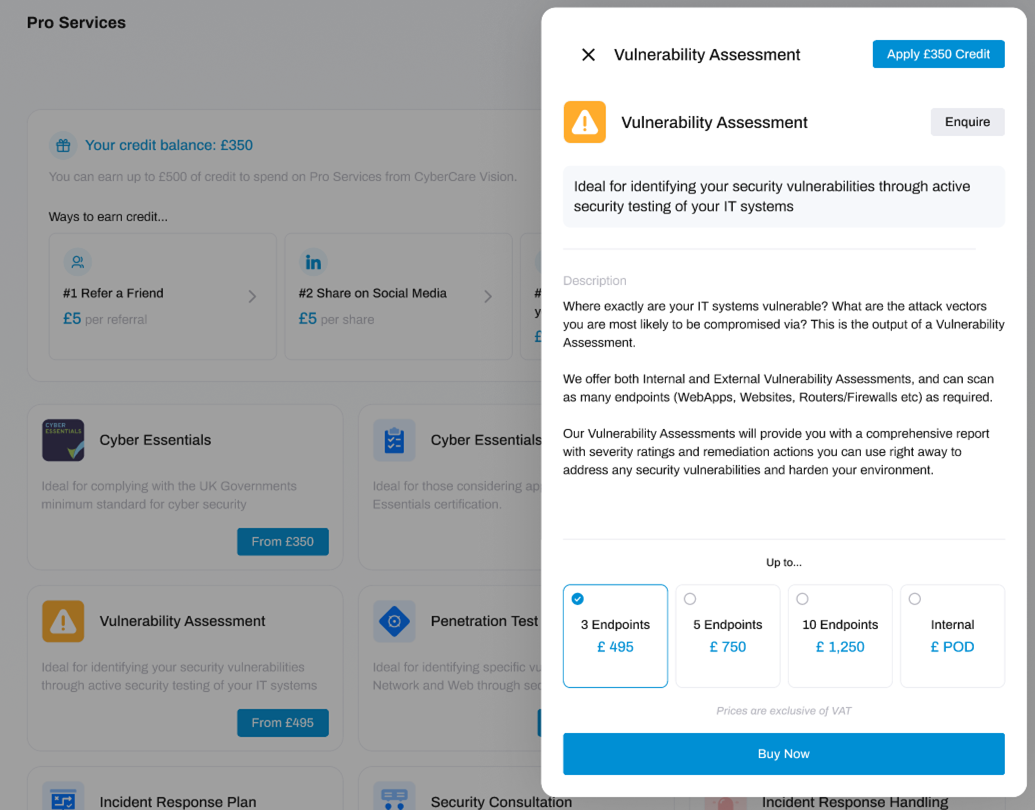
STEP 3: Choose the Purchase Option
Depending on the Pro Service you are looking at, there may be more than one purchase option to choose from. These options are shown at the bottom:
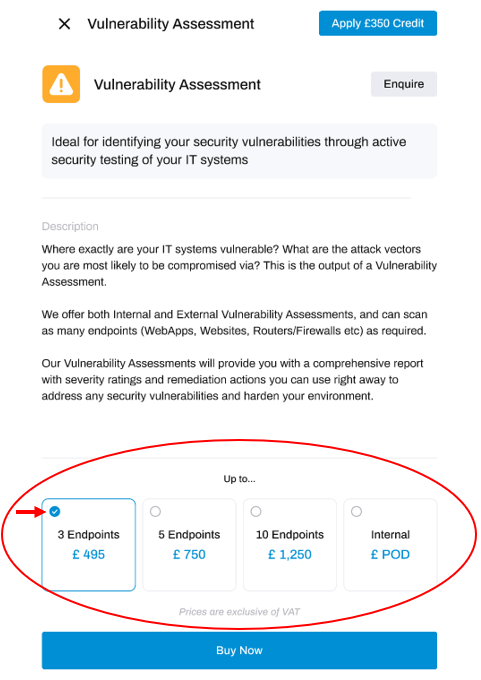
Ensure that the option you want to choose has a blue tick in it. If not, click that option to move the blue tick to your selected choice.
How do I make an enquiry about a Pro Service?
If you would like to make an enquiry to HighGround about any of the Pro Services available, follow the steps below:
STEP 1: Go to Pro Services
From the main left-hand menu, go to Pro Services:
STEP 2: Click on the Service
The Pro Services section of HighGround displays all the paid services we offer. You can scroll through these to find and click on the service you want.
This will open up a new window to the side, containing details and purchase options for that service.
STEP 3: Click Enquire
Click the Enquire button located towards the top-right of the service window:
STEP 4: Fill in the Details
Now you can add in the details of your enquiry, along with entering the phone number that you would like to be contacted on regarding the enquiry.
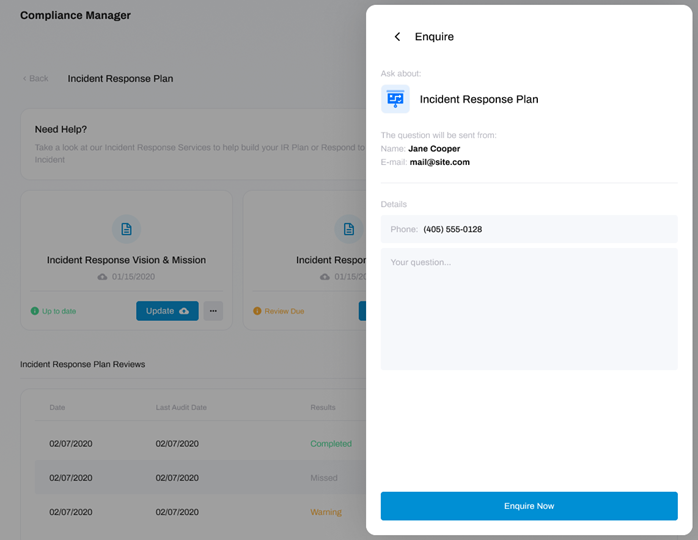
STEP 5: Send the Enquiry
Now the details are filled in, click the Enquire Now button to send the enquiry to us.

And that's it! We will receive your enquiry and respond within 48 hours.
How do I save money by using my Pro Services Credits?
Pro Services Credit enables you to save money on your purchases.
If you have earned Pro Services Credit, you can use them whenever you buy one of our Pro Services. The amount you have accrued in credit will be deducted from the cost of that service.
To learn how to apply your Pro Services Credit to a purchase, follow the steps below:
STEP 1: Go to Pro Services
Navigate to the Pro Services module from the left-hand side main menu.

In this module you will find all of our Pro Service offerings.
STEP 2: Pick a Service
Choose and click on the service which you would like to apply your Pro Services Credit to.
Clicking on any of the services will open a new window to the side of the screen, containing details and purchase options for that service:
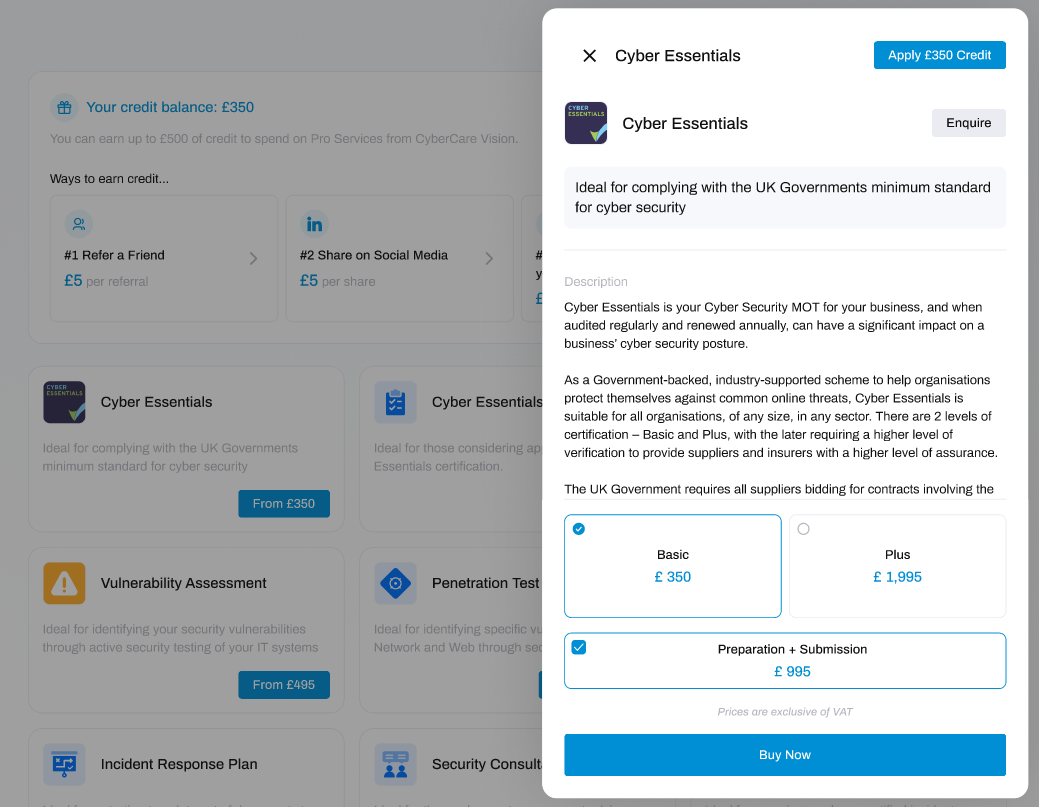
STEP 3: Apply Credit
Click on the blue 'Apply <your credit> Credit' button.
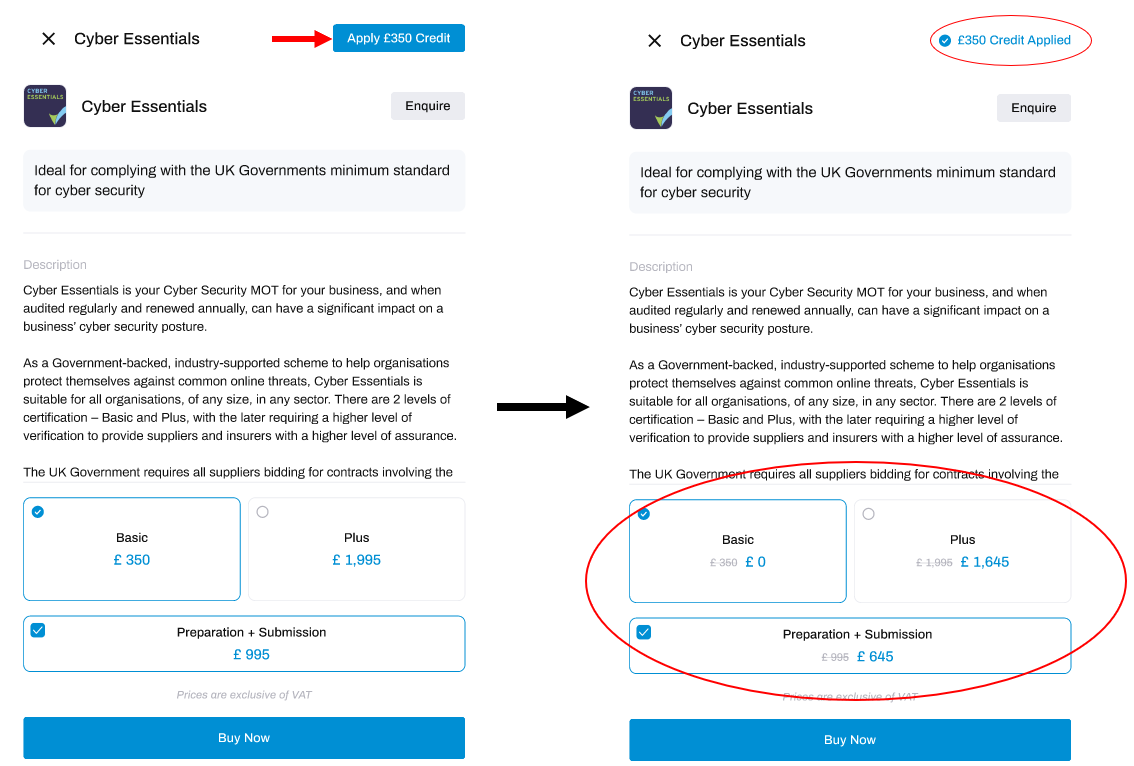
The button will change to inform you that your Pro Services Credit has been applied.
The amount of credit applied will also be reflected in the purchase options at the bottom, which will show the previous price scored out in grey, and the new, reduced price in blue.
STEP 4: Purchase the Service
Now your Pro Service Credits have been applied, click the Buy Now button to purchase this service

And that's it! Plus, you can save more money off of future purchases by earning more Pro Services Credit!
STEP 4: Buy the Pro Service
Now the details are filled in, click the Buy Now button to make the purchase.

And that's it! Thank you for your purchase, a notification will get sent to our Pro Services team who will contact you within 24 hours to get started with your service.
What happens after I buy a Pro Service?
We will reach out to you within 24 hours to arrange a meeting and schedule the service.
DeleteHow to Submit an Enquiry for Pro Services
If you would like to make an enquiry to HighGround about any of the Pro Services available, follow the steps below:
STEP 1: Go to Pro Services
From the main left-hand menu, go to Pro Services:
STEP 2: Click on the Service
The Pro Services section of HighGround displays all the paid services we offer. You can scroll through these to find and click on the service you want.
This will open up a new window to the side, containing details and purchase options for that service.
STEP 3: Click Enquire
Click the Enquire button located towards the top-right of the service window:
STEP 4: Fill in the Details
Now you can add in the details of your enquiry, along with entering the phone number that you would like to be contacted on regarding the enquiry.
STEP 5: Send the Enquiry
Now the details are filled in, click the Enquire Now button to send the enquiry to us.
And that's it! We will receive your enquiry and respond within 48 hours.
Reviewing your Incident Response Documentation:
Auditing is a crucial part of your Incident Response strategy. Without regular reviews of your Incident Response strategy, it is likely that aspects of your documentation may become out-dated and inapplicable - rendering your plan ineffective, or you will fail to spot gaps in your ability to respond in alignment with your organisations requirements. We suggest reviewing your Incident Response strategy every 90 days.
At the bottom of the Incident Response module you will see the Incident Response Reviews section:
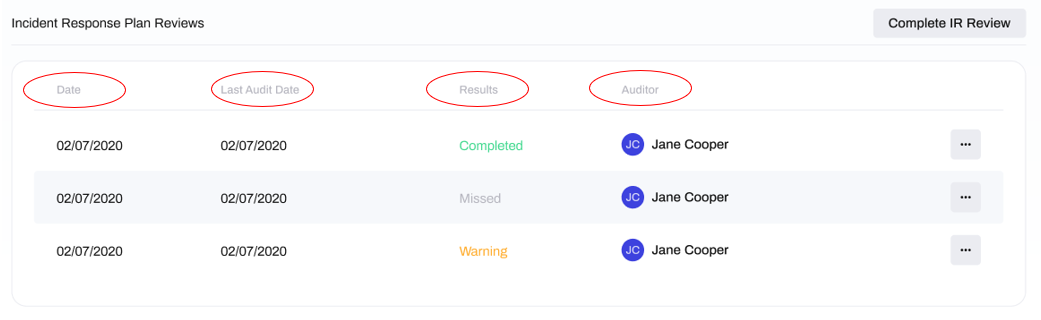
This section contains all of the previous reviews of your Incident Response documentation.
You can view the following information in the columns;
- Review Date: the date that the Incident Response Review was performed.
- Review Frequency: the frequency at which you performed the Incident Response Review (e.g. Quarterly, as per our recommendations and best practices).
-
Review Type:
- Default: the default Incident Response Review question set was used and has not been changed.
- Custom: the default Incident Response Review question set was modified, and/or new questions were added.
- Results: whether the Incident Response Review was Completed or was Incomplete.
- Auditor: the name of the person who conducted the Incident Response Review.
Understanding your Incident Response Status'
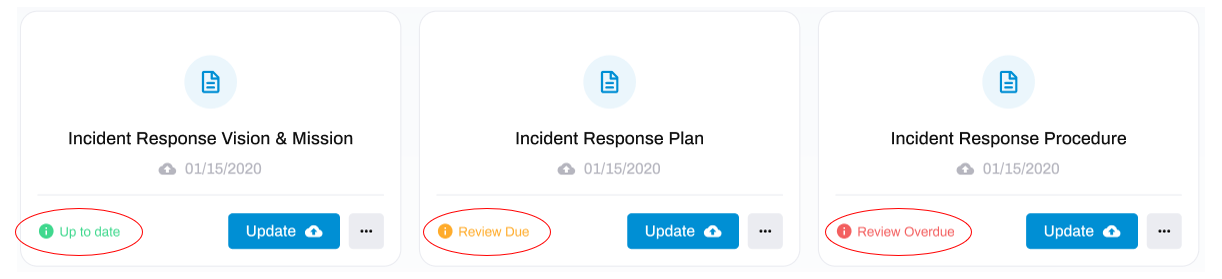
A healthy Incident Response Plan should should consist of a Vision & Mission, an Incident Response Plan and an Incident Response Procedure - all of which should be reviewed every 90 days. The Compliance Status' are designed with this in mind, and will keep you informed on the health of your Incident Response strategy.
To learn more about what your status means, choose the matching icon from the tabs below:

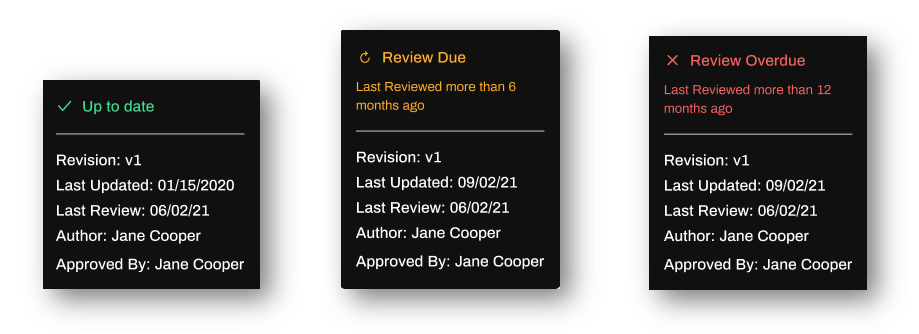
Status' in a default state appear as a blue cross, and indicate that you have not uploaded any Incident Response documents.
Delete
Status' in a healthy state appear with a green tick with a status of Ready. Overall, this status indicates that your Incident Response documents are in place and have been reviewed recently.
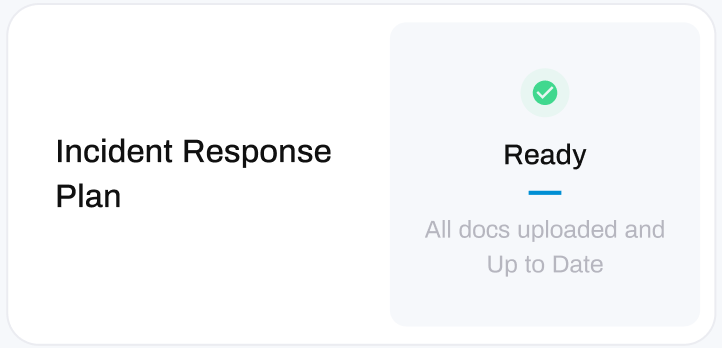
Specifically, this status indicates that:
- All Incident Response Plan documents are uploaded and have been reviewed within the last 90 days.
- You have created your Incident Response Plan documents in the last 90 days.

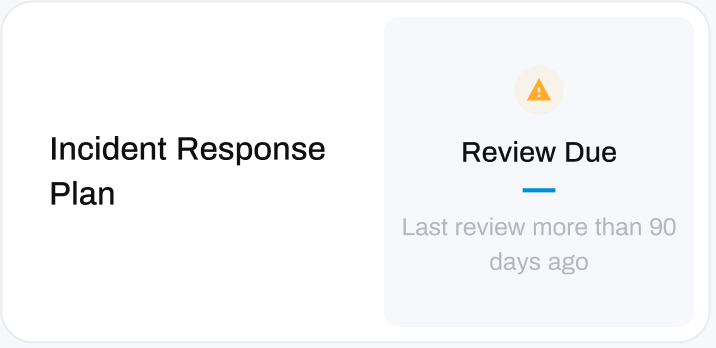
Status' in a warning state will show with an orange exclamation mark with a status of Review Due or Incomplete. Overall, this status indicates that your Incident Response Plan documents are either due for a review, or 1 or more documents are missing.
Review Due:
- Your documents have been uploaded, but they were last reviewed over 90 days ago.
Incomplete:
- Your are missing 1 or more Incident Response Plan documents.


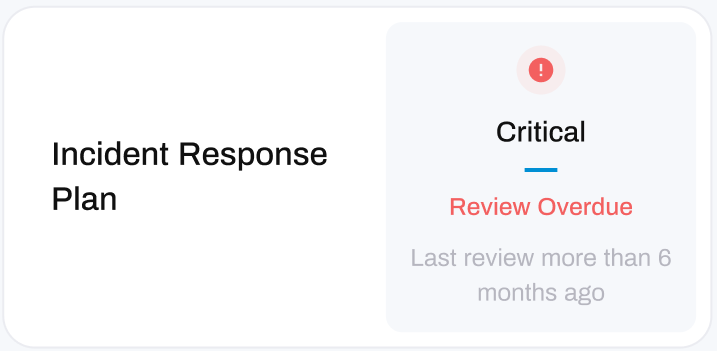
Status' in a critical state appear as a red exclamation mark with a status of Review Overdue. Overall, these statuses indicate that your Incident Response Plan documents have either expired or are overdue for a review.
Review Overdue:
- It has been over 180 days since your Incident Response Plan documents were last reviewed.
Find your Status Details:
You can see the specific details and reasons for your Compliance Status by hovering over the information icon located at the bottom-left of your document:
Doing so will trigger a small information box to appear. This box contains the reason for your status, along with the details:
- Revision: the current version of the Incident Response Plan document.
- Last Updated: the date the Incident Response Plan documents were last updated.
- Last Review: the date you last reviewed the Incident Response Plan document.
- Author: the name of the person who wrote the Incident Response Plan document.
- Approved By: the name of the person who approved the Incident Response Plan document for use
How-To Guides
Managing your Incident Response Documents:
Upload/Download Document
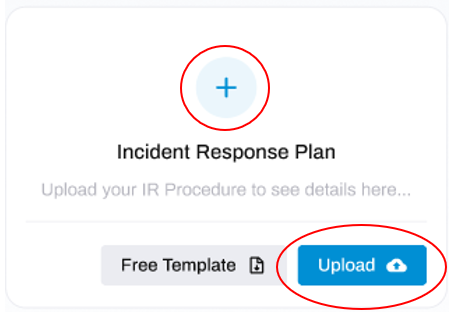
Upload:
To upload your Incident Response document, click either the + icon or up the Upload button located in the box for that document.
This will open a new window to the side, where you can attach your document and enter some relevant details: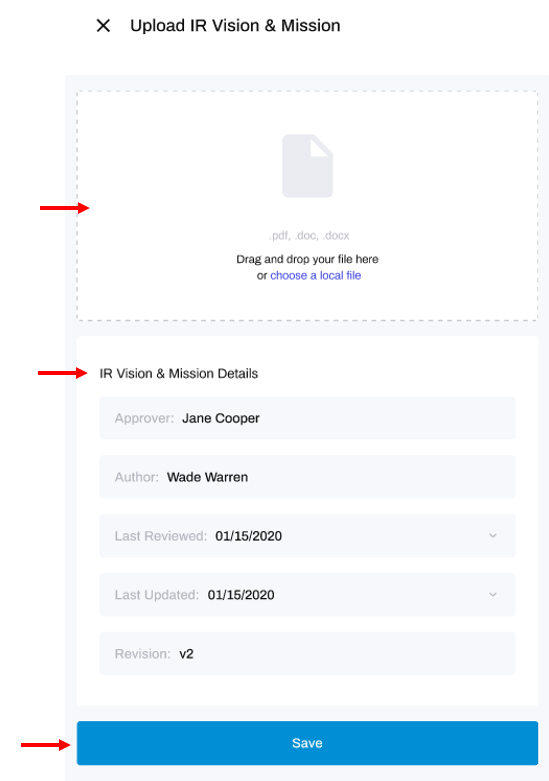
To attach the document, either drag and drop the file from a folder on your PC, or click the words choose a local file to search through your folders for the file you want.
Next, use the drop-down arrows in the Details section to add the following details;
- Approver: name of the person who has approved the plan/procedure for use
- Author: name of the person who wrote the document
- Last Reviewed: the date that the document was last reviewed
- Last Updated: the date that the document was last updated
- Revision: the current version of the document
After entering those details, click Save.
And that's it! You have uploaded your Incident Response document.
Download:
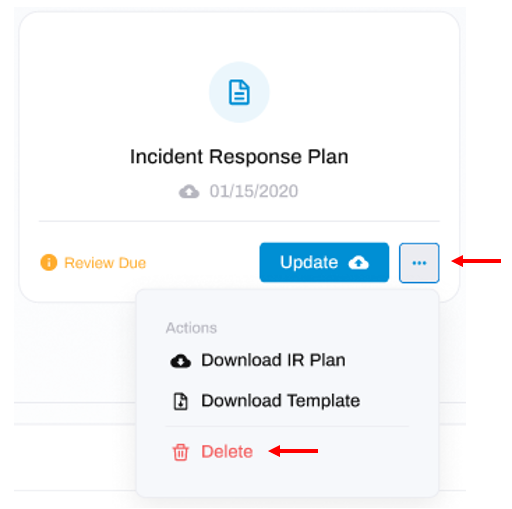
First, click the three dots to the bottom-right of the document's box, and select the first Download option.
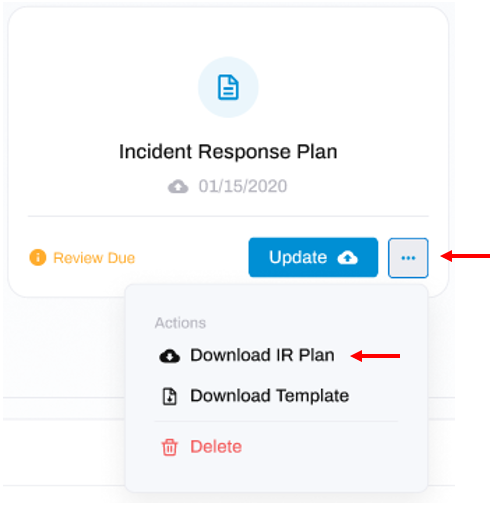
Your document should now be available on your device.
And that's it! You have downloaded your Incident Response document.
Delete Document
To delete a document, click the three dots to the bottom-right of the document, then click the Delete option.
That's it! You've deleted the document.
Managing Reviews:
Perform an Incident Response Review
Follow the steps below to perform an Incident Response Review:
STEP 1: Click Complete IR Review
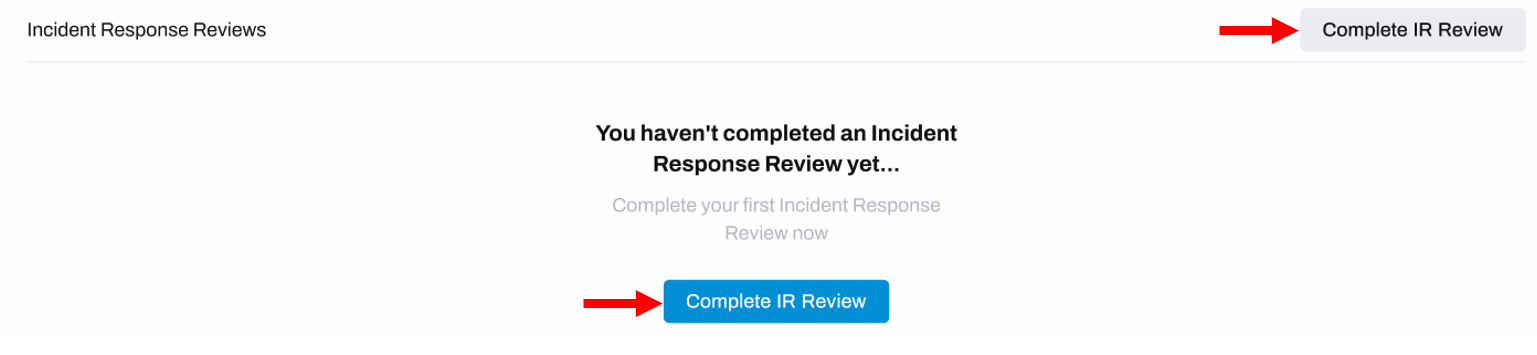
At the bottom of the Incident Response module is the section IR Review Results where you can perform an Incident Response Review.
Click either of the Complete IR Review buttons located in the centre or top-right of this section.
 This will open a new window.
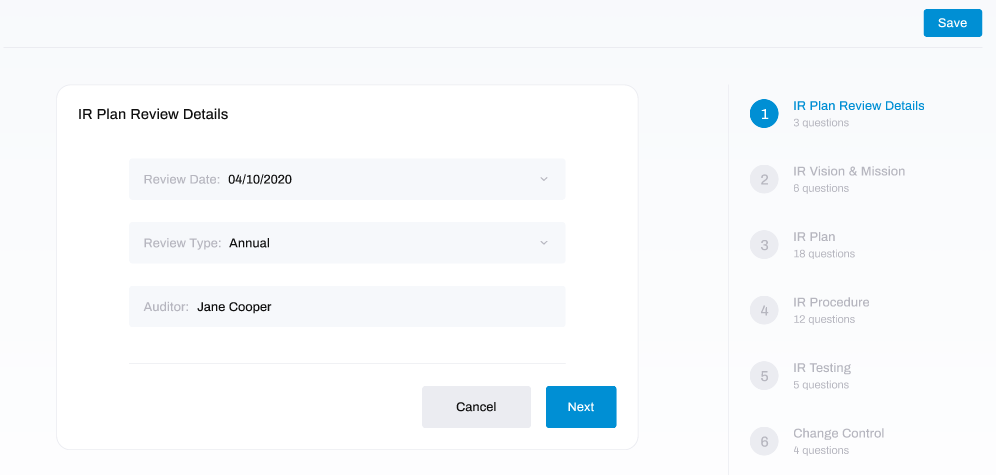
STEP 2: Add the Review Details
In this new window, use the drop-down arrows and text fields to enter the following details:
- Review Date: the date that the Incident Response Review is being performed.
- Review Type: the frequency at which you are performing the Incident Response Review (e.g. Quarterly, as per our recommendations and best practices).
-
Auditor: the person performing the Incident Response Review.
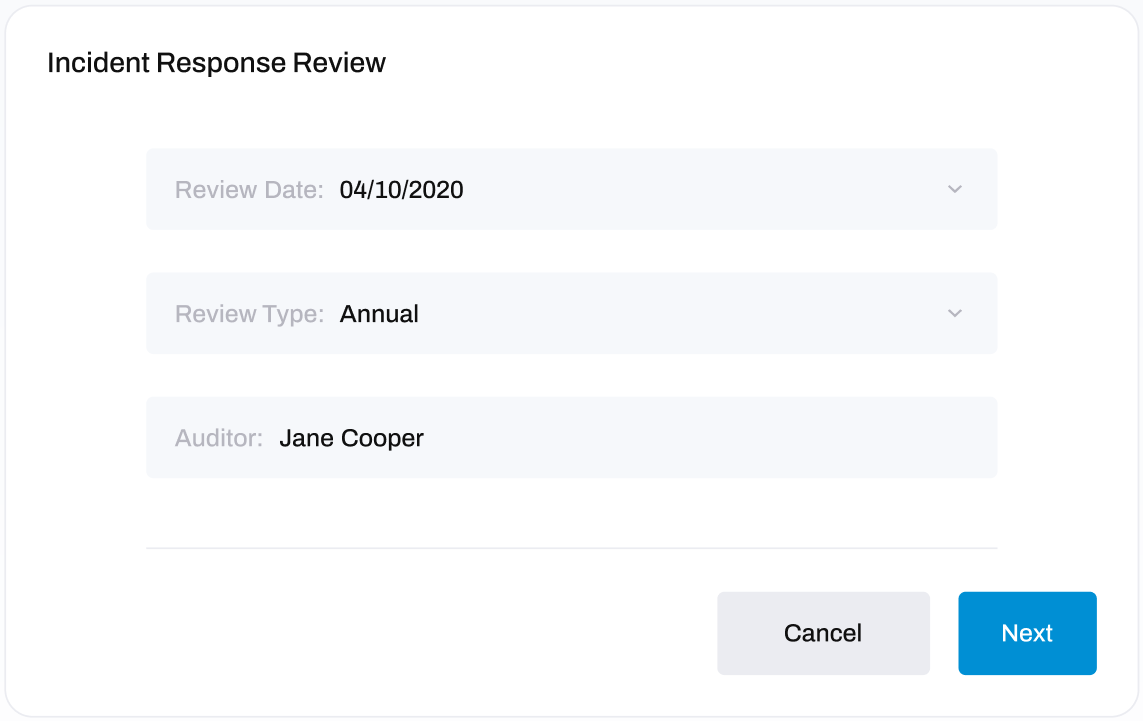
After you have added these details, click Next.
STEP 3: Review the Questions
Navigating a Review in HighGround
At the side of the review window is a progress section. Here you can see the various sections of the review, which sections you have completed, which are incomplete, and which are yet to be viewed:
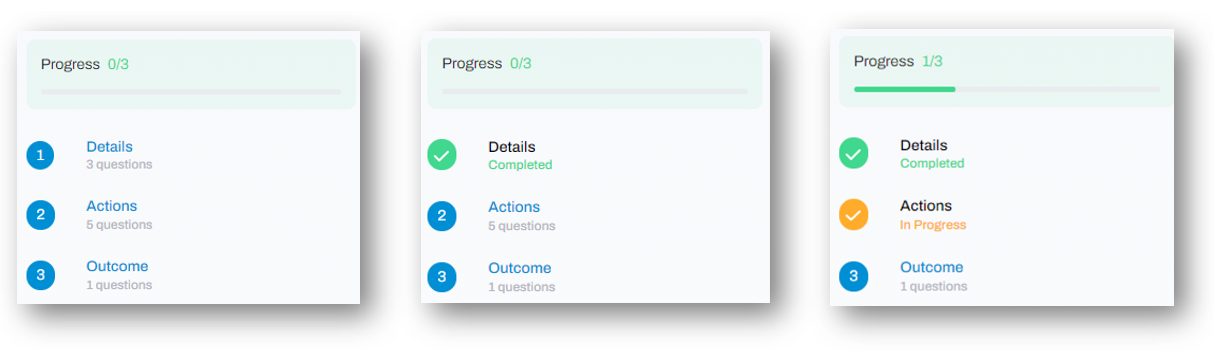
- Progress bar: indicates how much of the audit/review you have completed.
- Blue circle: indicates a section which has not been started yet.
- Orange tick: indicates the section has been started but is incomplete. This will occur if you leave a section without completing all questions.
- Green tick: indicates all questions have been answered in this section.
Additionally, you can click on any of the sections to quickly navigate to that stage of the review.
You will now see a window containing the review questions.
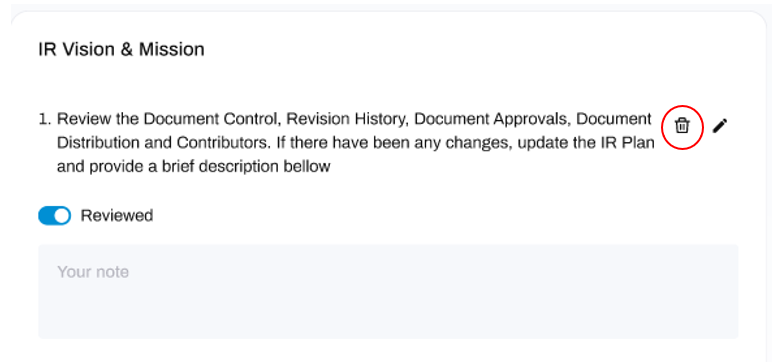
Read through each question carefully and perform any actions/checks required to answer the question. After, toggle the 'Reviewed' slider to on (blue).
You may also want to add notes to each question. You can do so by typing in the notes box below the toggle slider.
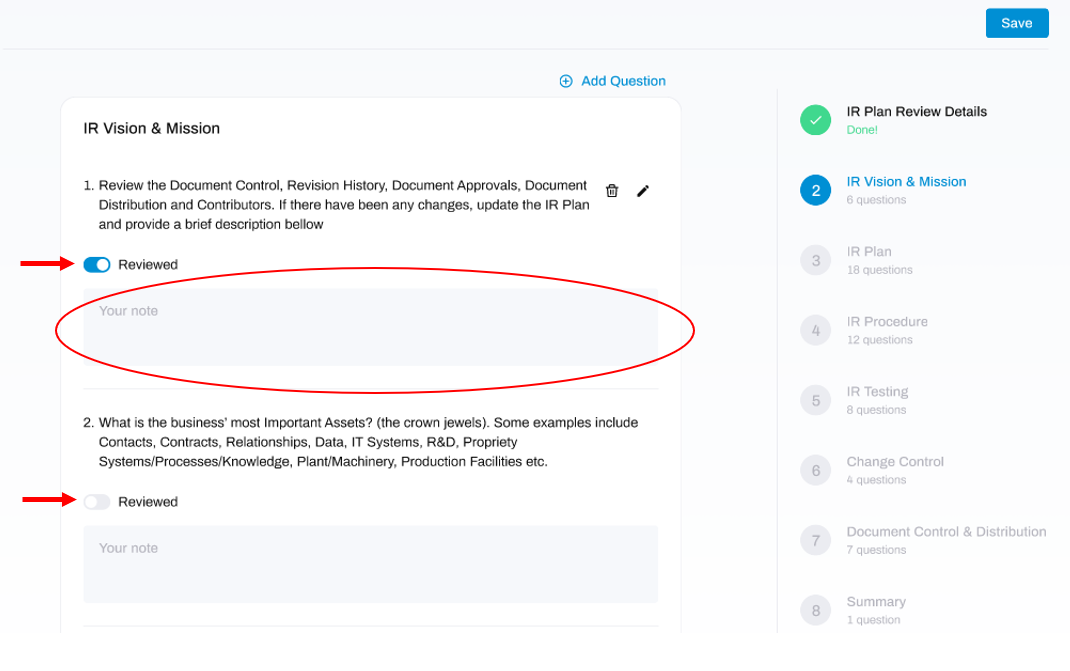
After you have reviewed all the questions, click the Next button located at the bottom-right of the page.
STEP 4: Complete Review
The final stage of the review involves writing a summary.
Make sure you have fully reviewed every section/question in the review document by ensuring the progress indicators at the right of the window are all displaying green ticks. If there are incomplete sections containing unanswered questions, these will be orange.
If you have completed all of the previous stages, enter an overall summary on the results of the review (including anything in the IR Plan that you believe needs to be changed/updated) and any relevant notes by typing in the note box.
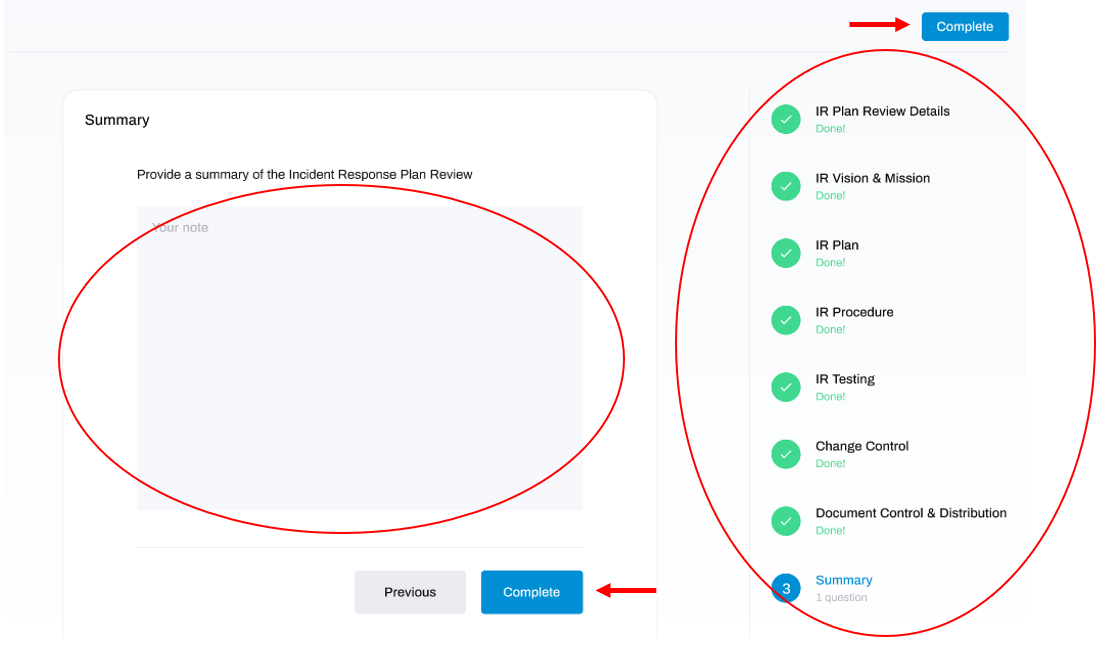
After completing the summary, click either of the Complete buttons.
This will take you to a new window where you will see your completed review.
And that's it! You have completed an Incident Response Review.
Edit a Review
You may want to modify the default questions in the review to customised questions of your choosing.
To do so, first go to the bottom of the Incident Response module to the 'Incident Response Reviews' section.
Then, click the three dots to the right of the Incident Response Review that you want edit, and click the Edit option.
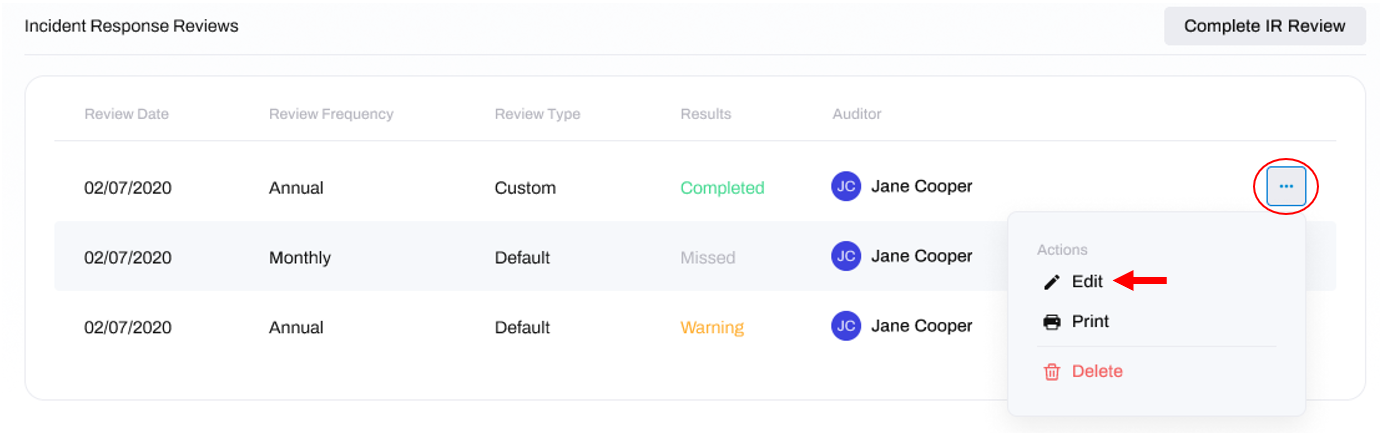
This will open up the Incident Response Review, where you can step through the individual sections to make edits.
To edit a question, select the pencil icon next to the question you would like to edit.

This will give the option to rewrite the question, or change the answer type. Remember to click Save afterwards to keep your changes.
And that's it! You have edited your Incident Response Review.
Delete a Review
To do so, first go to the bottom of the Incident Response module to the 'Incident Response Reviews' section
To delete an entire review, click the three dots to the right of the review that you want to remove, and click the Delete option.
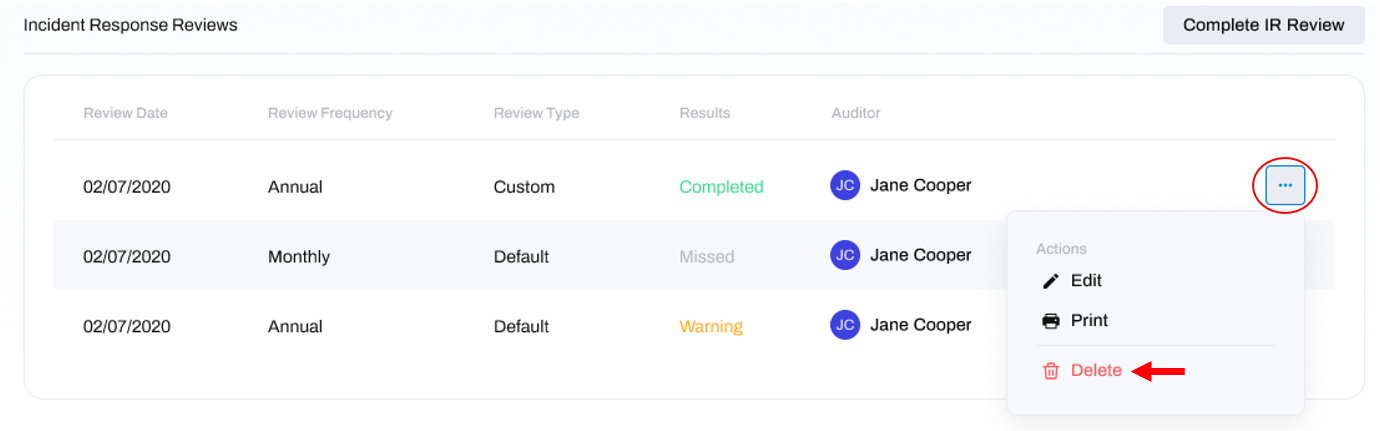
That's it! You've deleted an Incident Response Review.
Print Review
To do so, first go to the bottom of the Incident Response module to the 'Incident Response Reviews' section.
To print a review, click the three dots to the right of the review that you want to print, and click the Print option.
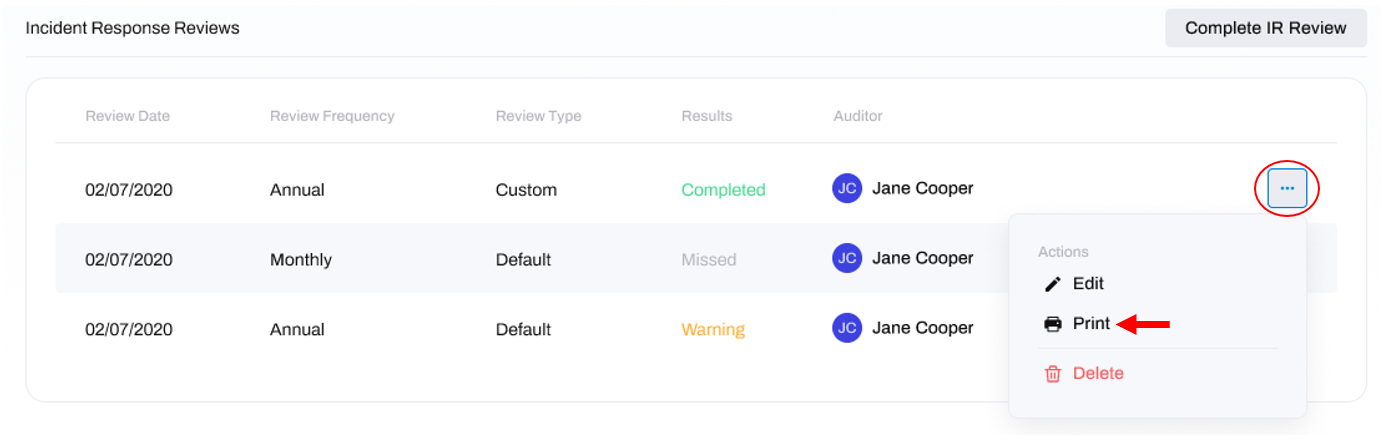
This will trigger a file download of your review either in a new tab, or as a file download, depending on your browser settings.
Add Question to Review
If you are already inside the review, simply click the Add Question button towards the top-right of the window.
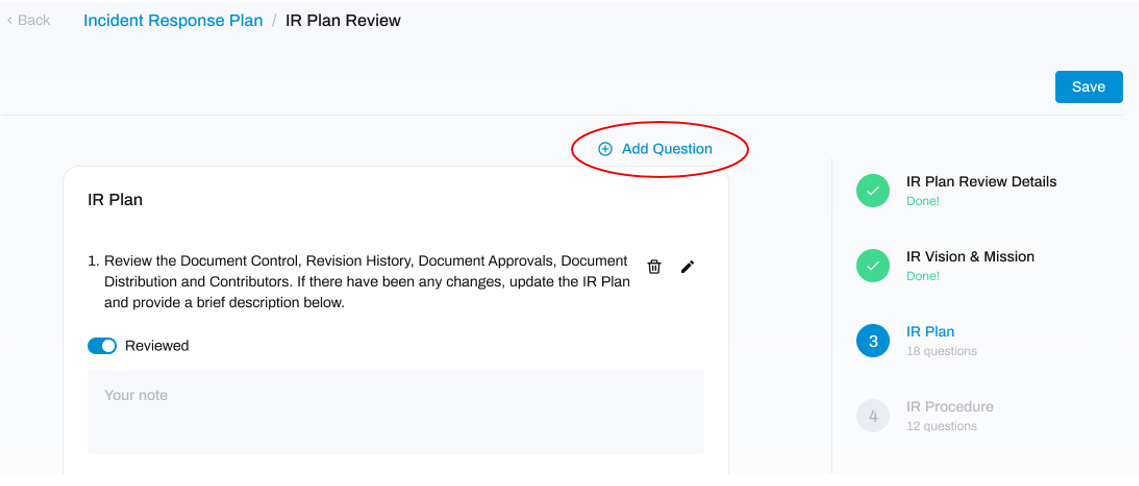
If you are not inside the review, you will need to click into it to see the Add Question button.
This will open a window where you can write your question, and decide the answer type (options include a Note Field, Yes/No box, or Date/Time selector).
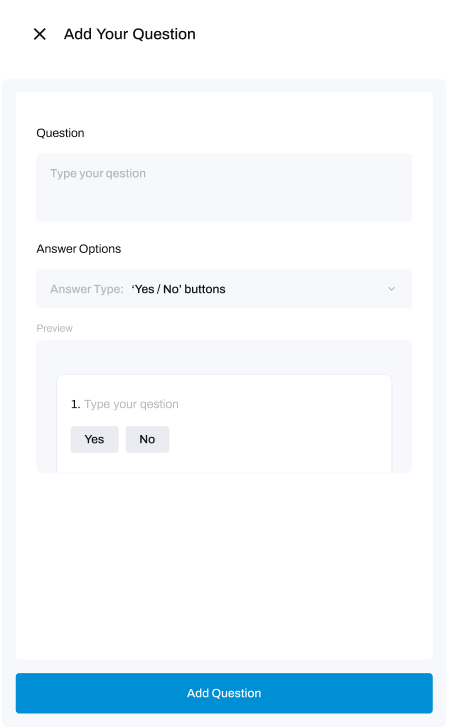
After composing the question, click Add Question to save it.
That's it! You've added a question.
Delete a Question
To delete a question from a review, select the bin icon next the question you would like to delete.
That's it! You've deleted a question.