
WARNING: Organisations managing multiple clients within Mimecast should be aware that the Mimecast API will retrieve data globally from across the MSP account and cannot be generated on a per-client basis. Before connecting this tool to HighGround, please ensure that you have the legal permissions to synchronise data from all clients within your organisation's Mimecast account.
You can use your Mimecast account alongside HighGround to retrieve your Email Filtering data. This data can then be used to drive your Cyber KPI's. In order to synchronise this data to your HighGround account, you will need to connect to Mimecast's API by first generating API credentials, and then integrating the tool via the Integrations module.
The following process is reasonably technical, so please have a member of your IT team complete this if you do not have any prior experience with API's.
Please follow the steps below to generate API credentials for Mimecast.
STEP 1: Go to Internal Directories
Login to your Mimecast account.
Click on the Administration tab at the top of the page, then select Directories, and Internal Directories:

You should now see a list of your domains.
The next step will involve creating a new email address to be used for the API connection. Click on the domain that you would like to add this email address to.
STEP 2: Create new API user
To create the new email address to be used for the API connection, click the New Address option from the row at the top:

This will open a new window for you to add the details of the new address.
Name the email address api user (followed by your domain name).
Create a password for the address, and take a note of it for use later on.
Tick the 'Password Never Expires' option
Note: Ticking the 'Password Never Expires' option ensures that your tool integration will not disconnect due to outdated credentials. However, for security reasons you should still periodically reset this password. You may want to set a calendar reminder to come back into Mimecast and reset the password, after which you will need to edit the integration in HighGround to add the updated password.

When you've entered those details, click Save and Exit to continue.
STEP 3: Create Admin and API Accounts folders
Now you've created the new user, click on Administration again, then go to Directories and Profile Groups.

Once in Profile Groups, look to the folder tree at the left of the window. You want to create two new folders underneath the Root folder.
To do so, click the little orange + located at the bottom-right of the folder icon:

There should now be a New Folder located as a sub-folder underneath Root:

At the top of the folder tree, you will see an area titled Edit Group that looks like below:

Change this text from 'New Folder' to 'Admin' and hit the Enter key.
Repeat this process again, this time creating another New Folder named API Account.

STEP 4: Add the api user address to the API Account folder
You will now need to add the email address of the api user account you created in step 1 to the API Account folder.
To do so, click on the API Account folder, then click Build and Add Email Addresses:

This will open another window containing a box for you to enter the email address:

In the details box below this, you may also want to add a note describing 'Used for HighGround Integration'.
Once you have added those details, click Save and Exit to continue.
STEP 5: Add Super Admins and Full Admins to Admin folder
To the Admin folder that you made, add all of your users that are assigned to the roles Super Administrator or Full Administrator.
I'm not sure what users I have assigned to those roles?
I'm not sure what users I have assigned to those roles?
If you are not sure of what users you have in these roles, you can go to the Roles page located under Account:
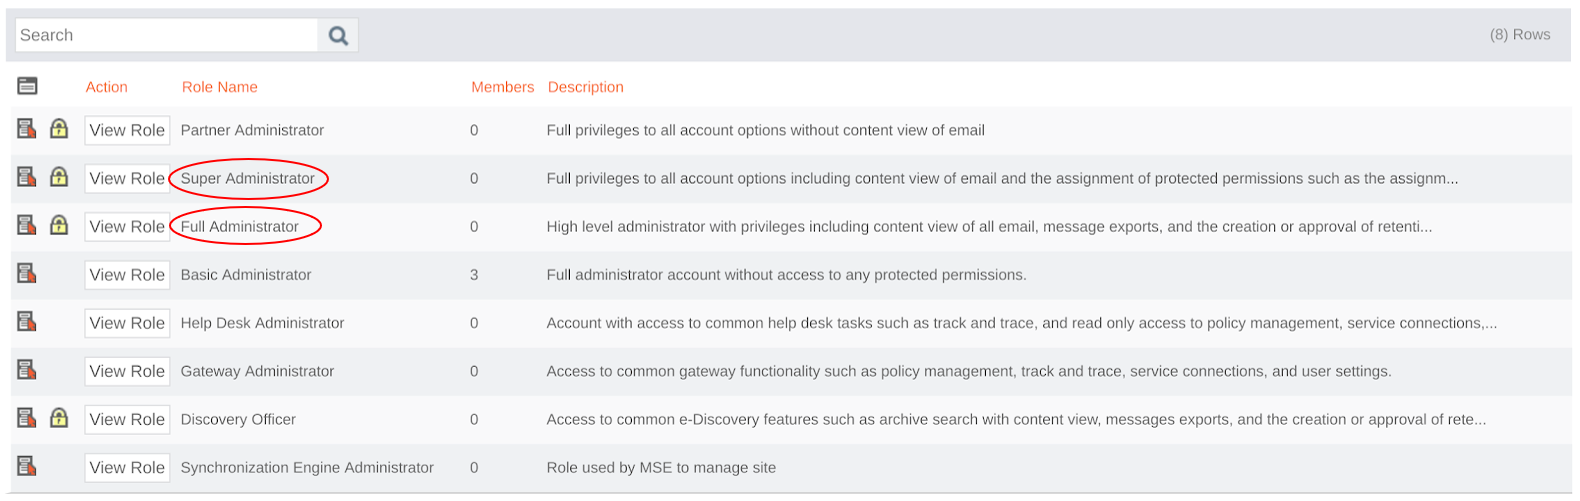
Clicking on the role will show you the users assigned to that role.
STEP 6: Assign api user to Basic Administrator rule
You now need to assign the api user you made to a Basic Administrator role.
To do so, go to the Roles page located under Account:

From the list of administrative roles you should now see, click on Basic Administrator:

Next, click on the Add User to Role button located at the top-left of the window:

Use the search bar to find the api user account.

Once you've located the api user account, tick the box next to the account, and then click the Add Selected Users button located near the top-left of the window:

The account will now be assigned to the Basic Administrator role.
STEP 7: Create a New Authentication Profile
You now need to create a new authentication profile.
To do so, go to Services, then Applications:

From the top row of tabs, select Authentication Profiles:

Next, in the new window, select the tab New Authentication Profile:

Give the authentication profile a description of 'API Profile' and ensure the Authentication TTL setting is set to 'Never Expires' (the rest of the settings can remain as default):

You can now chick Save and Exit, and you will see your new authentication profile displayed in the list.
STEP 8: Create a New Application
Go back to Applications, then right-click on Default Application Settings, and select Clone Configuration.

You will now see various settings which you can configure:
Firstly, set the description to 'API Settings':

Secondly, you will need to change the Group. Click the 'Lookup' button:

Then select the API Account group you made in step 3:

Thirdly, you will need to change the Authentication Profile. Click Lookup:

Then select the API Profile you created in the previous step:

Lastly, make sure the User Initiated Password Changes setting is ticked:

You can leave the rest of the settings as default.
Click Save and Exit to continue.
STEP 9: Login to the new API account
You can now move on to setting up the API Integration. To do so, you will first need to login to Mimecast again using the api user account your created in step 2.
STEP 10: Go to API and Platform Integrations
Now logged in with the api user account, you can to API and Platform Integrations:

You will see a pop-up window notifying you of the below, click Got It:

In the tabs near the top of API and Platform Integrations, select Your Application Integrations:

STEP 11: Add API Application
Once in your application integrations, click the 'Add API Application' button:

You will now see the first window where can add the details of the API Application.
For these details;
Make the Application Name 'HighGround.io'
Set the Category to Other
Tick the Enable Extended Session option
Provide a brief Description

After adding those details, click the Next button to continue:

In the second window you should;
Set the Developer to 'highground.io'
Add the address of the api user you created in step 2 (apiuser@yourdomain) to the Email field

Click the Next button again to continue, and you should see the final Summary window:

Check that all the details are correct, then click Add to finish adding the API application.

STEP 12: Create Keys
After clicking Add, you will see a window resembling the one below:

First, click the copy icons located next to the Application ID and Application Key. Paste these to keep as a note somewhere on your PC. You will need these again later on.
Second, click the Create Keys button to begin the process of generating the API keys you will need for the integration.
You should now see a window resembling the screenshot below. This is where you create the account that will be used to authenticate the API connection.
Add the Email Address you created in step 2 (apiuser@yourdomain).

Click Next to continue:

In the second window;
Select Cloud as the Type
Enter the Password for the account you created in step 2 (apiuser@yourdomain)

Mimecast will now use those credentials to verify the account. If the email and password are valid, you should now see a window like the one below:

Note: Make sure to keep a note of your Access Key and Secret Key (stored separately), as Mimecast will only show these once.
Copy the Access Key and Secret Key, and paste these to keep as a note somewhere on your PC. You will need these in the next step.
STEP 13: Integrate Mimecast to your HighGround Account
You can now use the API Keys retrieved in the previous steps to integrate the tool to your HighGround account.
To do so, you will need to go to the Integrations area of your HighGround account, and find the Mimecast tool under the Email Filtering technology. Clicking on 'Connect Tool' will open a window for you to enter your API credentials:

For the first field - URL - you will need to enter one of the URL's from the table below (selecting the correct option for your region):
REGION | HOST |
EU | |
DE | |
US | |
CA | |
ZA | |
AU | |
Offshore |
For the remaining field, enter the Keys and ID that you retrieved in the two previous steps of this guide.
After, continue in the integration window pictured above to complete the process of connecting your Mimecast account.